I wrote a blog post about an emerging method to design workflows, tentatively titled ‘1+1‘. I’m refining this a little and also have spoken to a few people about it, in particular, I stole a few minutes of Anthony Mann’s time (founder of Make us Proud, and YLD) in London over drinks to explore the idea. Interestingly, Anthony immediately saw parallels to signal processing apps which was quite an interesting insight – even more interesting to me as Signal Processing is something I happen to have had a lot of experience in from my artist days. This insight inspired me to think through that connection a little more… so, inspired by the chat with Anthony, the following takes ‘1+1’ a bit further, maybe I’ll iteratively call it ‘SignalPath Workflow Design’…
Signals
If you have never worked with applications such as PureData or (its closed counterpart) MaxMSP, then you may not know what Signal Processing is… these two applications belong to a category of software that is a kind of graphical programming, but very much targeted at (but not limited to) the audio-visual world. Taking PureData as an example, you essentially put objects on a page and draw connectors between these objects.
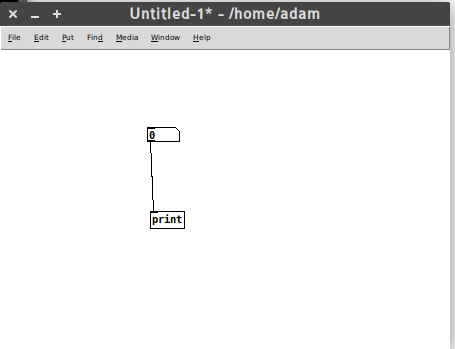
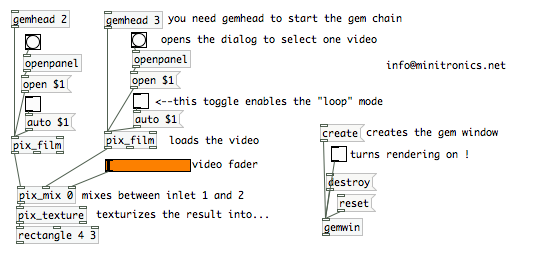
The connectors follow an inlet-outlet model which controls the flow of a signal from one object to the next. In the above diagram, the signal travels from the top object to the bottom object. With time, and a little expertise, you can design very complicated signal paths. The following is a video mixer built with PureData by Luka Princic.
If you want to know more about PureData, try this book that was created, in part, in the first non-Book Sprint I didn’t facilitate. There are also some kooky videos around showing Pure Data (PD) in action where the interface is the video – they are pretty cool, like this one or this! And of course, there is always graphical programming that takes the graphical literally.
So, how does this relate to workflows? Well, Anthony pointed out that situating a common Dashboard as the place all stakeholders go, to see what they have to do, and which links out to the place where they have to do it – is a basic signal processing model. A signal is fired off on the Dashboard, which the user of the software sees (the signal) and then they click on the link through to the space where they need to do it (essentially following a signal path). Ultimately, creating ‘signal paths’ should be easy to do in a workflow system as it is PureData, but we aren’t there yet. However, it is useful to take this Signal Processing metaphor into our design process as it gets across the basic idea… workflow is a series of signals, and signal paths. It is no more than that. Once we understand that, we can start designing the signals and the signal paths and, perhaps more importantly, even if it does take a little bit of coding, designing like this also has inherently embedded in it the idea that to change a workflow is merely rearranging (additively or by subtraction), the order of signals. If we can execute on this we can easily optimise workflows ‘as we go’ and avoid hardcoded prescriptive systems which have become the malignant virus in publishing today.
Also, just as an aside, the common dashboard, as useful as it is here for talking about objects (which snuggly fits in with the PureData metaphor), the dashboard is not critical. It is the orginating signal that is critical, it doesn’t matter where it emanates from. It could be from a dashboard, but equally, it could come from email, an app, chat notification…whatever. I am indebted to Anthony for making this salient point.
Spaces
In the world of Signal Processing software, the signal travels from one object to another by following a signal path. In the world of platforms that encapsulate workflows, the signal carries the user from one space to the other. Let’s just say, for simplicity’s sake, the originating space is the dashboard. So, a signal (these are notifications in the software world so I will use these interchangeably) is witnessed by the user, who then clicks through to the space where they have to do what they have to do.
Let’s look at a concrete example from the word of journals – a Managing Editor needs to sanity check all new submissions. They see a new submission appear on their dashboard. Next to it is a link, and they click through to the submission and read through it. That is a simple signal path, in this case, a notification path directing a user from one space (dash) to the other (submission page).
So this is pretty simple: the interesting thing to note is that we could go through every step in a workflow and map out this signal path. Who needs to do what is what defines a ‘step’ in a workflow. If we listed this out for any workflow, it would look something like this, formatted as who does what for each step:
- author fills out submission data
- managing editor checks submission data
- managing editor assigns handling editor
- …etc
So, we could map this out one step after the other and draw a simple signal path for each step, until the whole workflow is accounted for. The problem here, is that if we were to design a system like this, we would have a whole lot of unique objects (spaces) with each step showing a signal originating on a dashboard and then ‘carrying the user’ to a unique space. That’s not very helpful as you would soon end up with hundreds of one-action unique spaces.
Instead, what we must do is follow the ‘1+1’ model I wrote about earlier. The basic principle is to reuse spaces as much as possible, and only add new ones when we absolutely can be sure the existing spaces can’t be reused.
In action… if you consider the above three steps in a workflow, you will note that the first 2 steps involve doing something with submission data. So, let’s just reuse that same space. That way we have covered two-thirds of the above 3 steps with just 1 new space (apart from the dash).
If we can do this through the entire workflow, we will, if disciplined, end up with a very simple diagram of spaces. For example, for Collabra Psychology Journal we have the following:
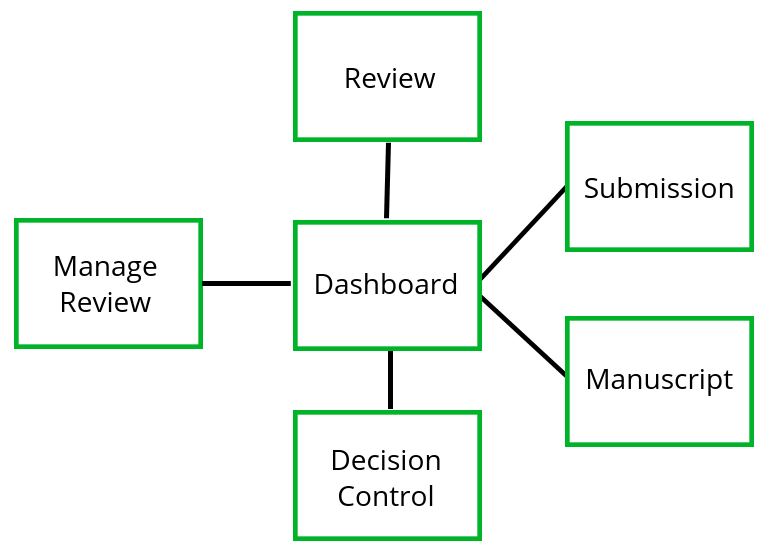
That’s it… it will pretty much cover the workflow of most journals. The thing to understand when capturing the workflow in the above is not only the spaces, but the order of signals. If you want to see how this applies to Collabra, have a look at the slides I put together outlining this. You can also check out the same method applied to the Wormbase micropublications platform.
The Dash, Single Actions, and Flexibility
As mentioned above, the dashboard is a handy mechanism to originate the signal/notification to someone that something has to be done, and then ‘carry them’ there via a link etc
However… when designing systems like this, it is also important to recognize the difference between a single action that could be easily executed from the dashboard (ie. without ‘going anywhere’) and an action that requires an additional space from which it can be executed. This line is fuzzy since single actions could be placed anywhere. For example, let’s take steps 2 and 3 in the workflow described above. The Managing Editor can view the submission and then the only thing they need to do is assign a Handling Editor (not quite true, they have a choice of simple actions, but let’s just go with this for now). If we know the preset list of Handling Editors (Journals always do) then we can simply choose one from a dropdown list. Done. I would argue that this action is best placed on the Dashboard. That does mean that the user (Managed Editor in this case) has to follow the ‘signal path’ from Dash to Submission, read the submission data, and then ‘travel back’ to the Dash to execute this assignment. That isn’t a terrible burden on the Managing Editor, but I can see why someone would argue that this action should instead be placed on the Submission page to simplify things and avoid this ‘additional travel’.
I can see that argument but if we do this we create very conditional interfaces that are fixed to one prescribed order of signals and is hard to change later. To avoid this I believe we should try and avoid as much conditional logic as possible in spaces other than the dashboard. If we embed the conditional logic only in the dash, then we have only one place to change when we decide at a later date to further optimise the workflow.
The knock on effect of this is that each space really is an operational context where actions of a certain kind take place… for example, in the Collabra spaces diagram above, we have a ‘Manage Reviewer’ space. All those that see this space, to avoid embedded conditional logic, should see the same thing. Whoever sees this space, sees all the tools necessary to manage a review for a specific paper. The trick is then only to enable or disable access to these spaces according to a set of pre-determined attributes or criteria. If we can do that, then optimising a workflow really is a matter of re-ordering signals, and very little other system tweaking needs to be applied.
How to use Signal Path Flow Design
The process is actually quite simple:
- right down a who does what order of signals, optimise as you go
- start with a dashboard (its a handy starting point) and go through the workflow step by step
- at each step ask yourself, is this a single action best handled on the dashboard? or do I need another space?
- if you need another space, see if you can use an existing one. If you can, use that.
- If you can’t use an existing space create a new one
There is a bit of wrangling needed, but so far I have found this a pretty effective way of capturing seemingly complex workflows in relatively simple systems, systems that can also be ‘easily’ optimised over time.