Ok..Jitsi initial install is easy. Working out letsencrypt is soso documented but also easy, working out how to get desktop sharing working is barely documented.
Installing Jitsi-meet
Basically…do this to get Jitsi working:
https://github.com/jitsi/jitsi-meet/blob/master/doc/quick-install.md
It works as advertised for Ubuntu. Except, don’t use the stable sources. We couldn’t get them to work with conferences – we could only get 1 person in a meeting which…er… isn’t a meeting! So, instead use the unstable sources, which means don’t use this:
echo 'deb https://download.jitsi.org stable/' >> /etc/apt/sources.list.d/jitsi-stable.list
Use this:
echo 'deb https://download.jitsi.org unstable/' >> /etc/apt/sources.list.d/jitsi-unstable.list
Then follow the rest of the docs.
Not mentioned in the rest of the docs is this….you need to set up several sub-domains, namely:
conference.[your jitsi domain]
auth.[your jitsi domain]
focus.[your jitsi domain]
jitsi-videobridge.[your jitsi domain]
Make sure that if your Jitsi-meet is already using a subdomain (eg. jitsi.mydomain.com) that you add the above subdomains on top of that eg conference.jitsi.mydomain.com not conference.jitsi.com
Now…you need to change a few things. Open the file located at /etc/prosody/conf.d/[YOUR JITSI DOMAIN].cfg.lua, it should look something like this:
Component "jitsi-videobridge.[YOUR JITSI DOMAIN]"
    component_secret = "sjhfss09"

VirtualHost "auth.[YOUR JITSI DOMAIN]"
    authentication = "internal_plain"

Component "focus.[YOUR JITSI DOMAIN]"
    component_secret = "Hjusk78is"
Change both secrets to a random string of the same length. The copy the first one to this file /etc/jitsi/videobridge/config where and uncomment the secret, eg:
# sets the shared secret used to authenticate to the XMPP server
#JVB_SECRET=e355kYFm
JVB_SECRET=sjhfss09
Do the same for the second secret by adding it to this file /etc/jitsi/jicofo/config, eg:
# sets the secret used to authenticate as an XMPP component
#JICOFO_SECRET=Ifc7gffV
JICOFO_SECRET=Hjusk78is
Thanks to Juan Gutierrez for working out the above changes to the files.
Letsencrypt
Also easy, except it doesn’t say anywhere how to do it. There is a nice script for it which is already present but you need to find it. On Ubuntu you can find it in /usr/share/jitsi-meet/scripts/
So to get it running do this (as root or using sudo):
cd /usr/share/jitsi-meet/scripts/
./install-letsencrypt-cert.sh
The script should just ask you for a valid email address. Follow the instructions and it ‘just works’. You*may* need to restart jitsi to do that try this:
/etc/init.d/jitsi-videobridge start
Then navigate to your domain prefixed by https and it should work.
Desktop Sharing
Ha..just when you thought it was so, so, easy! It’s actually pretty easy but it’s not well documented. Essentially you have to install an extension in your browser that allows desktop sharing permissions. However this is domain specific so you have to download the extension and configure it, then compile it and then load it into your extensions. This is true for Firefox and Chrome/Chromium. I haven’t tried for Firefox but the following works for Chrom(e)ium.
Visit this page – https://github.com/jitsi/jidesha – and clone the repo or download it as a zip.
Next, with your fav text editor open the file in the ‘chrome’ directory called manifest.json, it looks like this:
{
 "manifest_version": 2,
 "name": "Jitsi Desktop Streamer",
 "description": "A simple extension that allows you to stream your desktop into meetings with Jitsi Meet and Jitsi Videobridge.",
 "version": "0.1.6",
 "minimum_chrome_version": "34",
 "icons": {
 "16": "jitsi-logo-16x16.png",
 "48": "jitsi-logo-48x48.png",
 "128": "jitsi-logo-128x128.png"
 },
 "background": {
 "scripts": [ "background.js" ],
 "persistent": true
 },
 "permissions": [
 "desktopCapture"
 ],
 "externally_connectable": {
 "matches": [
 "*://meet.jit.si/*"
 ]
 }
}
You want to edit the last line:
"*://meet.jit.si/*"
to reflect the domain of your jitsi install eg
"*://jitsi.myserver.org/*"
or whatever… don’t put in http or https or anything, just replace the domain information.
Now, you need to compile that extension. Follow these steps:
- If you open up your chrome browser go to (in the location bar) chrome://extensions
- check the box ‘developer mode’ if it is not already checked
- you will see a button ‘pack extension’ appear at the top, click this
- click the button next to ‘extension root directory’
- browser to and select he ‘chrome’ directory where you have that manifest.json file
- click ‘open’
- click ‘pack extension’
A new file ‘chrome.crx’ will appear.
Now you need to load that into your extensions, to do that you need to drag the chrome.crx file to the extensions page open in your browser. It will then just appear, by default it is enabled.
Now…you are almost there…you now have to go to your server and make a few changes. These all happen in one file, the jitsi meet config file. Open the file ‘/etc/jitsi/meet/[YOUR JITSI DOMAIN]-config.js’ with your fav text editor.
You need to change these lines:
  // The ID of the jidesha extension for Chrome.
 desktopSharingChromeExtId: 'put your Chrome extension ID here',
 // Whether desktop sharing should be disabled on Chrome.
 desktopSharingChromeDisabled: false,
 // The media sources to use when using screen sharing with the Chrome
 // extension.
By default, there will be no chrome extension ID and sharing is default turned off. Make sure desktopSharingChromeDisabled is set to false, and put your chrome extension ID in between single quotes after desktopSharingChromeExtId.
But… I hear you say…. what is my chrome extension ID? good question… to get this, go back to your browser and in the chrome://extensions you will see an id listed next to your jitsi-meeting extension. It will be a long string of numbers and letters next to the simple text ‘ID:’
Copy and paste that into the config between single quotes, no spaces and exclude the ‘ID:’ bit. Save and exit the config file. You shouldn’t have to restart Jitsi but if you feel like playing it safe restart as per above.
Navigate to your jitsi meeting and it should work under https, show the desktop sharing icon, and enable desktop sharing! Good luck! I’ll be testing out our install in the next weeks and will post here. Oh…if you wish to replace the default jitsi watermark on the top right then replace the file /usr/share/jitsi-meet/images/watermark.png with a transparent png.
(if anyone would like to walk me through how to do the same for Firefox I’d be grateful and I will also publish that info here.).
Update: Sept 3. Juan worked out how to get the extension in the chrome store. Was easy apparently but cost $25USD.
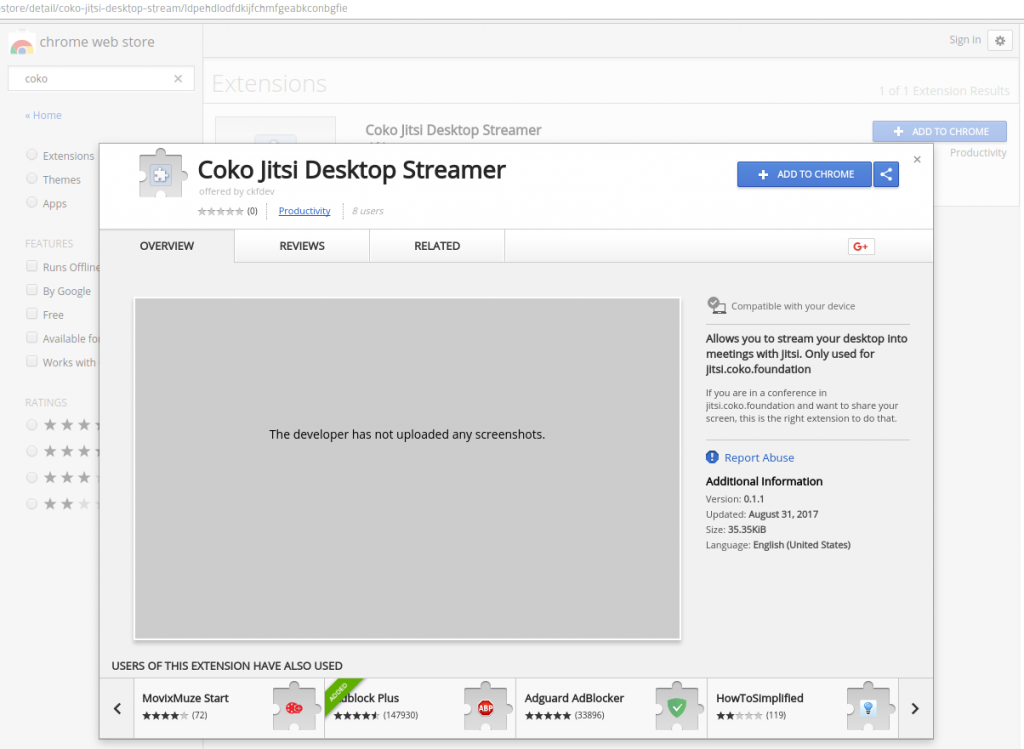
Now if you try our Jitsi and need to screenshare, then clicking on the screenshare icons redirects you to the above Coko plugin in the Chrome store.
If you found this post useful, repay it by taking the time to document a tricky issue you worked through so others can benefit from what you learned! (I’m forever grateful for the amazing stuff I’ve found online in some random blog somewhere that have helped me out of seemingly unique tech gotchas!).